
If you were on the internet in the 90s then you probably remember what life was like before pop-up blockers. Even the person who invented pop-up ads regrets doing it. Using the internet today can feel the same as 30 years ago, with alerts and banners everywhere. With things like GDPR cookie warnings starting in 2018 and COVID alerts in 2020 the web looks more and more like this parody site with every passing year. What’s worse is that according to this accessibe.com article the large majority of these pop-ups don’t pass basic WCAG accessibility guidelines. These modals and alerts often contain agreements that need acceptance before proceeding. This means that people with different browsing needs can often be blocked from the entire site.
All that said, sometimes, there are things you still want to show a user before they proceed. I needed such an alert to warn users that there’s most likely unexpectedly broken code in the “lab” section of my site.
This post will walk through how I used Svelte to build an accessible alert that also won’t annoy users too badly. It also incorporates a cache-busting mechanism in case the content ever changes and users need to see it again.
The Basic Component
The <Alert /> component markup is pretty straightforward. It accepts a few props — show for defining when the alert is visible, a title to display as an internal header, and a close function.
Since this is going to be a reusable component, I’m using the Svelte <slot /> element to pass content into the main body of the component.
<script>
  export let show
  export let close
  export let title
</script>

{#if show}
  <div>
    <section>
      <header>
        <strong>
          {title}
        </strong>
        <button on:click={close}>
          Close
        </button>
      </header>

      <div>
        <slot />
      </div>
    </section>
  </div>
{/if}
The HTML <dialog> Element
When trying to make accessible content, people tend to reach for adding ARIA attributes to their HTML elements. But, the first rule of thumb for ARIA is actually to try not to use ARIA.
Many of these widgets were later incorporated into HTML5, and developers should prefer using the correct semantic HTML element over using ARIA, if such an element exists.
HTML5 introduced the <dialog> element for content like this, so it will be the foundattion for my component. The <dialog> element will be understood by modern screen readers and also comes with built-in conveniences like an open attribute to toggle visibility and a ::backdrop pseudo element to handle the overlay on the content behind it.
<script>
  export let show
  export let close
  export let title
</script>

{#if show}
  <dialog open on:click={close}>
    <section>
      <header>
        <strong>
          {title}
        </strong>
        <button on:click={close}>
          Close
        </button>
      </header>

      <div>
        <slot />
      </div>
    </section>
  </dialog>
{/if}
It might seem weird to be attaching a click event to fire the close function to the actual <dialog> element, but there’s a reason for that I’ll cover in a bit.
Unfortunately, Safari doesn’t fully support the <dialog /> tag. For now, that means ARIA is required, although maybe as browser support improves this could one day be removed.
The good news is that rather than render nothing, Safari will still render the element but instead treat it like a normal <div>. Because it will be rendered as a non-semantic element, I can mark it with the ARIA role='dialog' so that any Safari screen reader will still treat it correctly.
<script>
  export let show
  export let close
  export let title
</script>

{#if show}
  <dialog
    open
    on:click={close}
    role='dialog'
  >
    <section>
      <header>
        <strong>
          {title}
        </strong>
        <button on:click={close}>
          Close
        </button>
      </header>

      <div>
        <slot />
      </div>
    </section>
  </dialog>
{/if}
In order to be fully accessible, any role element needs to meet two other criteria:
- The dialog must be properly labeled
- Keyboard focus must be managed correctly
To address the first point, two more attributes can be added to the <dialog /> tag — aria-labelledby and aria-describedby — and pointed to their corresponding elements using a generated id. aria-labelledby should point to the primary identifier of the element, the <header />. aria-describedby needs to identify additional context, which in this case is the main <div />.
I’ll get back to the second criteria later in the post.
<script>
  export let show
  export let close
  export let title

  const id = slugify(title)
</script>

{#if show}
  <dialog
    open
    on:click={close}
    role='dialog'
    aria-labelledby={`${id}-title`}
    aria-describedby={`${id}-content`}
  >
    <section>
      <header id={`${id}-title`}>
        <strong>
          {title}
        </strong>
        <button on:click={close}>
          Close
        </button>
      </header>

      <div id={`${id}-content`}>
        <slot />
      </div>
    </section>
  </dialog>
{/if}
Stacking Context
Visually, one of the most important features of a modal or alert is that it appears on top of the rest of the site content. It might seem sufficient to just add a very high z-index, like 9999, but because of how stacking context works this sometimes still isn’t enough to get an element to the forefront of the page. Josh W Comeau has a good article that explains why z-index is more complicated than just assigning the highest number.
Instead of relying on only CSS, I wanted my modal to take advantage of the fact that the HTML document will stack elements according to DOM source order. This means that the closer to the end of a document an element is, the higher it will appear by default on the z-axis.
My site is already set up in such a way that each page is created with a <Page /> Svelte component that I use to include shared page elements like the header and the footer. Adding a place for the alert to render at the end of the pages is as easy as adding a named <slot />. Because I don’t want errant HTML to render on pages that don’t need it, I’m also checking to see if an alert is present using the $$slots object that Svelte provides.
<SEO {...$$props} />

<div id='site'>
  <Header />

  <main>
    <slot />
  </main>

  <Footer />
</div>

{#if $$slots.alert}
  <slot name='alert' />
{/if}
The particular alert I’m building needs to go on any pages in the /lab section of my site, so I need to add the code for the actual alert to the <Lab /> component that serves as the template for those subpages. To learn more about how exactly templates on my blog work, I have another post that goes into depth, or there are the official mdsvex docs. Either way, just know that anything added to the <Lab /> component outside of the default <slot /> will appear on every page that matches the url /lab/[slug]. The <Lab /> template is also responsible for managing the showAlert and closeAlert props.
<script>
import Page from './page.svelte'
import Alert from '$components/misc/alert.svelte'
let showAlert = true
const closeAlert = () => {
showAlert = false
}
</script>
<Page {...$$props} >
<slot />
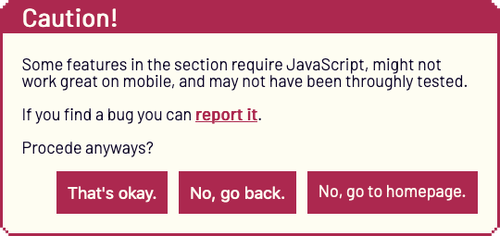
<Alert
title='Caution!'
show={showAlert}
slot='alert'
>
<p>
Some features in the section require JavaScript,
might not work great on mobile,
and may not have been thoroughly tested.
</p>
<button on:click={closeAlert}>
That's okay.
</button>
</Alert>
</Page>
Using the slot='alert' prop on an element inside of the <Page /> component will render it inside of the <slot name='alert' /> in the parent component and add it to the bottom of the page.
Basic CSS
Many of the styles applied to the alert will vary depending on the site, but there are a few positioning styles that I wanted to cover.
The first thing to do is to make the <dialog /> element cover the entire screen using position: fixed. position: fixed works similarly to position: absolute, but instead of using the closest position parent like absolute does, fixed will position the element relative to the browser window. By combining this position with height and width of 100% and a top, right, bottom, and left of 0, the <dialog /> box will be stretched to cover the entire viewport. Just to be safe, I gave it an incredibly high z-index as well, even though we shouldn’t need it because of the document ordering from earlier.
dialog {
  position: fixed;
  top: 0;
  right: 0;
  left: 0;
  bottom: 0;
  z-index: 9999;
  height: 100%;
  width: 100%;
  display: flex;
  justify-content: center;
  align-items: center;
  background: transparent;
}
The page-height element is also set to display: flex with both align-items and justify-content set to center to keep the content in the center of the screen.
At first it might seem odd to set background: transparent; on the element, since usually these types of alerts show a dark overlay while covering the site. This, again, has to do with the <dialog /> element not being supported in Safari. Instead of using its native ::backdrop I have to fake this functionality with a normal ::after pseudo element, stretched to cover its entire parent with position: absolute. It also has a z-index: -1 to make sure that it stays behind the <section /> element that will contain the main content of the alert.
dialog::after {
  content: '';
  display: block;
  position: absolute;
  top: 0;
  right: 0;
  bottom: 0;
  left: 0;
  background: black;
  opacity: .5;
  z-index: -1;
  pointer-events: none;
}

section {
  width: 100%;
  max-width: 50rem;
  background: white;
}
It is entirely possible to set a background color directly on the <dialog /> itself, but I wanted to use the opacity property to adjust the alpha value to make a transparent version of one of my site’s existing colors.
One other important note here is to make sure and set pointer-events: none; on the ::after element that is covering the <dialog />. Setting the pointer-events property to none will let any clicks pass through the ::after element and activate the on:click event attached to the background <dialog />.
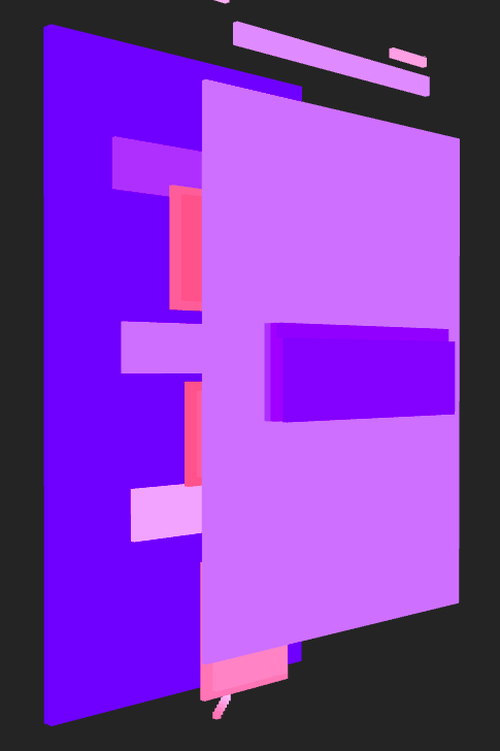
Stacking elements like this can quickly get confusing, so I highly recommend using the new 3D View DevTools in Microsoft Edge. This screenshot shows the <dialog /> element covering the viewport, the <section /> at the forefront of the site, and the rest of the site content being covered by the alert and it’s overlay.
Managing tabindex
tabindex is an HTML attribute that describes the order in which the browser will focus on elements when a user navigates the page using the Tab key. Browsers will automatically assign based on document order, but the HTML spec allows for manipulation in some scenarios. Much like ARIA, it is usually best practice to leave this alone unless you have a very good reason to manually change it.
I have to manually swap a few tabindex attributes to make everything else on the page inert to someone tabbing through the site while the alert is open.
<SEO {...$$props} />

<div
  id='site'
  tabindex={$$slots.alert ? -1 : 0}
>
  <Header />

  <main>
    <slot />
  </main>

  <Footer />
</div>

{#if $$slots.alert}
  <slot name='alert' />
{/if}
To make everything within the main body of the site in the <Page /> component non-focusable when the alert is active, I set a tabindex of -1 to remove it and its children from the native document tab flow. Because the only two things on the page are the #site and the <Alert />, a user shouldn’t be able to focus on any element in the background. When $$slots.alert is empty, the ternary will return falsy and set tabindex='0', which will return the element to its original, unset tab order.
tabindex='-1' means that a user can’t focus on the element using their keyboard, but it also makes any element, even things like a regular <div>, focusable with JavaScript.
A negative value (usually tabindex=“-1”) means that the element is not reachable via sequential keyboard navigation, but could be focused with JavaScript or visually by clicking with the mouse. It’s mostly useful to create accessible widgets with JavaScript.
<script>
  export let show
  export let close
  export let title

  const id = slugify(title)
</script>

{#if show}
  <dialog
    open
    on:click={close}
    role='dialog'
    aria-labelledby={`${id}-title`}
    aria-describedby={`${id}-content`}
    tabindex='-1'
  >
    <section>
      <header id={`${id}-title`}>
        <strong>
          {title}
        </strong>
        <button on:click={close}>
          Close
        </button>
      </header>

      <div id={`${id}-content`}>
        <slot />
      </div>
    </section>
  </dialog>
{/if}
By also adding tabindex='-1' to the <dialog /> element inside the alert, JavaScript can make sure a user’s focus is set when it is opened.
Trapping Focus
Another accessibility requirement for modal content is that it “traps focus,” meaning that a keyboard user cannot navigate outside of the area, analogous to how an overlay on the rest of the site prevents a mouse user from clicking on background elements. This is the second rule from the role element guidlines. The ARIA dialog best practices guide explain what this means pretty explicitly:
| Key | Function |
|---|---|
Tab |
Moves focus to next focusable element inside the dialog. When focus is on the last focusable element in the dialog, moves focus to the first focusable element in the dialog. |
Shift + Tab |
Moves focus to previous focusable element inside the dialog. When focus is on the first focusable element in the dialog, moves focus to the last focusable element in the dialog. |
Escape |
Closes the dialog. |
To handle the escape key the special <svelte:window /> component can accept an event listener to create a global way to exit the modal.
The main component can use a Svelte Action to attach and remove the events listeners for trapping focus.
<script>
  export let show
  export let close
  export let title

  const id = slugify(title)

  import focusTrap from 'actions/focus-trap.js'
</script>

<svelte:window on:keydown={event => {event.key === 'Escape' ? close() : null}}/>

{#if show}
  <dialog
    open
    on:click={close}
    role='dialog'
    aria-labelledby={`${id}-title`}
    aria-describedby={`${id}-content`}
    tabindex='-1'
    use:focusTrap
  >
    <section>
      <header id={`${id}-title`}>
        <strong>
          {title}
        </strong>
        <button on:click={close}>
          Close
        </button>
      </header>

      <div id={`${id}-content`}>
        <slot />
      </div>
    </section>
  </dialog>
{/if}
An action is just a function that will be passed the node on which the use: directive was called. The function is called as soon as the element is created, which in the case of my alert means whenever the show prop becom true.
The first thing I want to do when an alert is created is focus on it, which I can do with the .focus() method thanks to the tabindex='-1 from earlier.
function focusTrap(element) {
  element.focus()
}
The next step is to get a list of every element that should be focusable within the <dialog /> box. Taking inspiration from this article by Zell Liew, I used a list of natively focusable elements and created a focusableElements array, filtering out any that should be skipped.
const elements = [
  'a',
  'button',
  'input',
  'textarea',
  'select',
  'details',
  '[tabindex]'
]

function focusTrap(element) {
  element.focus()

  const focusableElements = [...element.querySelectorAll(elements.join(', '))]
    .filter(element => !(element.hasAttribute('disabled') || element.tabIndex === -1))
}
Next, borrowing more logic from this article by Hidde de Vries, the <dialog /> can listen for all keydown events and check if they were the Tab key.
If a user has pressed the Tab key, I want to prevent the default response and implement my own. The two things I need to know for this custom behavior are which element is currently in focus, which I can do by checking the document.activeElement against my focusableElements array, and whether the user intends to move forwards or backwards through the DOM, which I can do by checking whether or not they have included the shiftKey. The idea is to call .focus() on the next focusableElements item when the user presses just Tab, and on the previous element if they have pressed Shift + Tab.
const elements = [
  'a',
  'button',
  'input',
  'textarea',
  'select',
  'details',
  '[tabindex]'
]

function focusTrap(element) {
  element.focus()

  const focusableElements = [...element.querySelectorAll(elements.join(', '))]
    .filter(element => !(element.hasAttribute('disabled') || element.tabIndex === -1))

  element.addEventListener('keydown', event => {
    if (event.key === 'Tab' || event.keyCode === 9) {
      const currentElementIndex = focusableElements.indexOf(document.activeElement)
      event.preventDefault()

      if (event.shiftKey) {
        currentElementIndex === 0
          ? focusableElements[focusableElements.length - 1].focus()
          : focusableElements[currentElementIndex - 1].focus()
      } else {
        currentElementIndex === focusableElements.length - 1
          ? focusableElements[0].focus()
          : focusableElements[currentElementIndex + 1].focus()
      }
    }
  })
}
Navigating the focusableElements array is slightly more complicated because the user needs to loop through the elements if they move forwards from the last element or backwards from the first.
Dealing with focus trapping can get much more complicated than what I need to account for in my fairly simple alert. Luckily, there are existing libraries out there to help deal with these complicated situations. If I were dealing with this again, I might reach for something like focus-trap, or maybe even svelte-focus-trap which takes this same logic and pre-packages it into an action.
Persisting data with localStorage
The very last thing to do is make sure that users don’t see the same alert over and over, every time they re-visit the site. Since this data is going to be specific to a user and I want it to persist between visits, localStorage is a good candidate.
When a user closes the alert, instead of just toggling the showAlert variable, the function also needs to write to the browser’s storage. localStorage will store key-value pairs, so the function can set false for 'labAlert' and this will exist until a user manually clears their browser data.
When the page loads, the component also needs to look into localStorage and see if the user has closed the modal in the past. Svelte component code runs in both the client, where the window object exists, and on the server, where window will be undefined. Before trying to access window.localStorage the component needs to check if typeof window !== 'undefined' to avoid erroring on the server. This check isn’t necessary inside of closeAlert since running that function can only be triggered by a user in their browser and not ever on the server. It’s also important to check if the returned value is equal to a string value of 'false' rather than the boolean false because localStorage will coerce any set value to a string.
<script>
  import Page from './page.svelte'
  import Alert from '$components/misc/alert.svelte'

  let showAlert = true
  if (typeof window !== 'undefined' && window.localStorage.getItem('labAlert') === 'false') {
    showAlert = false
  }

  const closeAlert = () => {
    showAlert = false
    window.localStorage.setItem('labAlert', false)
  }
</script>

<Page {...$$props} >

  <slot />

  <Alert
    title='Caution!'
    show={showAlert}
    slot='alert'
  >
    <p>
      Some features in the section require JavaScript,
      might not work great on mobile,
      and may not have been thoroughly tested.
    </p>

    <button on:click={closeAlert}>
      That's okay.
    </button>
  </Alert>

</Page>
But wait… what if the content in the modal changes and a user needs to see new, important data before they proceed? This can be accomplished by storing the content of the alert in localStorage instead of only a one time boolean value.
The text content of the alert can be abstracted to a variable that will hold the HTML as a string. It can then be used in the body of the component using Svelte’s @html template syntax. When a user calls the closeAlert function, instead of storing 'false', the function can use the browser’s btoa method to convert the alertContent to a base64 string and store it. Since btoa(alertContent) will return a different string given new content, when the component checks localStorage.getItem('labAlert'), showAlert will be set only if a user has seen this exact content before.
<script>
  import Page from './page.svelte'
  import Alert from '$components/misc/alert.svelte'

  const alertContent = `
    <p>
      Some features in the section require JavaScript,
      might not work great on mobile,
      and may not have been thoroughly tested.
    </p>
  `

  let showAlert = true
  if (typeof window !== 'undefined' && window.localStorage.getItem('labAlert') === btoa(alertContent)) {
    showAlert = false
  }

  const closeAlert = () => {
    showAlert = false
    window.localStorage.setItem('labAlert', btoa(alertContent))
  }
</script>

<Page {...$$props} >

  <slot />

  <Alert
    title='Caution!'
    show={showAlert}
    slot='alert'
  >
    {@html alertContent}

    <button on:click={closeAlert}>
      That's okay.
    </button>
  </Alert>

</Page>
btoa, just like localStorage only exists in the browser so it will need the same window check to not error on the server. Since btoa (which stands for “binary to ASCII”) returns a string, it can be used directly in the === check, unlike a boolean that needs to be coerced.
The Final Product
The final component should be something that has both an ergonomic experience for the developer, and a non-intrusive experience for the site user. Hopefully I managed to accomplish both.
As usual, thanks to the Svelte discord for helping me figure out a few aspects of the code, particularly kursus75 and c-bandy with help around localStorage and Svelte stores and GrygrFlzr for help with my deploy.
I hope this walkthrough helps people build their own inclusive version of this component. If this does help you build something cool, shoot me a link on Twitter because I’d love to see it! Reach out with any questions or concerns too, especially if there are any errors I need to fix with this component’s accessibility.
Also head over to the /lab section of my site to see this component in action, as well as all the weird experiments I’ve got there.