
The information in this post might still apply to SvelteKit, but its likely to be different. I would reccomend not starting a new project in Sapper at this point.Sapper's succesor, SvelteKit, is currently available for use. All development efforts moving forward will be focused on SvelteKit.
If you get stuck, reach out for help in the Discord chatroom. See the migration guides for help upgrading from older versions.
Last month I wrote about creating an NPM package with Svelte. This month I built a basic CRUD site that would let other people use the color-contrast-table package tool I made.
The sitemap for the project was pretty basic.
HOMEPAGE
 - A list of all the site's users
 - New Users can be created here.
  └─ /OWNER
   - A user's list of palettes that they own.
   - New Palettes can be created here.
    └─ /PALETTE
     - A specific color palette that contains an array of color data.
     - New Colors can be created here.
     - A user can go into edit mode to live edit and save existing colors.
     - A user can view and edit JSON for the color data.
For the final product, check out the code on GitHub or the live site.
The Tech Stack
Svelte
Because I wrote the same NPM package in three frameworks, I had three options to choose from for this project. I’ve mentioned in several previous posts that I’m interested in learning more about Svelte. Svelte is also a great fit for this project becase, as their homepage says Svelte is -
Truly reactive. No more complex state management libraries — Svelte brings reactivity to JavaScript itself.
Built-in, easy reactivity is ideal since the main feature of this site are users changing color values and viewing information in real time.
Routify
Because I already used Sapper on a few other projects, I started this one out using it too. However, I quickly ran into a big issue.
Sapper works best in two scenarios:
- as a node.js app running on a server and dynamically generating pages
- as a statically served site with a predetermined URL structure
Serving the site statically meant that I would need to trigger a build and a re-deploy any time a user added any new data. While it is possible to deploy a Sapper project in Node-mode to Vercel, I wanted to host this site on Netlify to avoid trying too many new things at once. Maybe next time I’ll give Vercel a shot.
Luckily, Routify exists as an entirely client-side routing solution for Svelte apps. This means that the site could still deploy statically to Netlify, and instead of running a Vercel server to create dynamic pages, I could do all the work in a user’s browser. As a bonus, Routify has a very similar API to Sapper so it wasn’t a huge lift to refactor.
Routify has three main concepts.
File Structure
Routify and Sapper both use file system naming conventions to organize the site’s final page heirarchy. The file structure within the /pages directory roughly translates to how the site will be built.
/pages/index.svelte/ becomes the homepage and /pages/page-name.svelte/ would become /page-name. Routify can also translate index files from directories into routes so /pages/nested/index.svelte/ would live at /nested on the live site. Files, or folders, can be named with square brackets surrounding them to pass dynamic parameters — /pages/nested/[name].svelte/ would catch any direct subpage of the /nested url, and would pass the name value into that page as a parameter.
My site structure was pretty shallow and my /pages directory looked like this:
/pages
 ├─ index.svelte
 ├─ [owner]
 │ ├─ index.svelte
 │ └─ [palette].svelte
<Router> Component
Routify interacts with the browser’s window.url API by wrapping an entire app in the <Router> component. The dev, serve, and build commands in the package.json file will need to be changed to use the routify command instead of rollup.
<script>
  import { Router } from '@sveltech/routify'
  import { routes } from '@sveltech/routify/tmp/routes'
</script>

<Router routes={routes} />
This looks sort of magical as the routes object doesn’t need to be manually defined anywhere. Instead it’s imported from a file generated by Routify based on the file structure I outline above. This handles pushing the correct url to the browser when a user clicks a link, as well as catching a nested URL that a user might visit directly and loading the correct internal page.
Passing Url Parameters
Routify will link between pages with regular <a href='...'> tags, but to actually pass dynamic data into the special [name].svelte file you need to use the $url helper. The $url() function accepts a URL string, using colons to denote variables, and also a ‘params’ object.
For my site, each owner contains a name and slug property.
{ name: 'Ryan Filler', slug: 'ryan-filler' }
In order to create a link that would read correctly and take the user to the correct page, the anchor tag looks like this.
<a href={$url('/:owner', {owner: owner.slug})}>
  {owner.name}
</a>
sanity.io
Now that the site could dynamically access data, that data needed somewhere to live.
Sanity describes itself as a “fast, flexible platform for delivering structured content,” which sort of means that it functions as a database as a service. Sanity works as a hosted store for data that can be easily retrieved via their HTTP API and their GROQ language. GROQ, which is short for Graph Oriented Query Language, is very similar in syntax to GraphQL but without the need to write your own database resolvers. Sanity lets you post to a url, or use one of their language client interfaces to fetch and post data.
I started my project with the official Sapper Starter, but I wouldn’t actually recommend doing this. This starter comes with a Sapper site (that I ended up replacing with Routify), and a way to locally run the backend Sanity Studio. If you’re using Sanity more as a CMS this probably makes sense, but since I really just needed a data store I found it much easier to skip the local development and work on my database directly in the hosted version on sanity.studio.
The “structured” aspect of Sanity’s approach to data comes from the schema.js file. A schema is a description of each data type and what fields, or accessible values, will be collected on each type. Each field is given a “schema type” which defines what someone querying the data can expect to get back.
The schema.js file isn’t technically required since the Sanity API will accept any data and store it, but filling out this file helps make sure any posted data conforms to expectations.
Since each page would need to be backed by a corresponding data type the schema for my site was roughly the same as the site map. The homepage would be a collection of owners, each of which is defined in the schema like this:
{
  title: 'Owner',
  name: 'owner',
  type: 'document',
  fields: [
    {
      title: 'Name',
      name: 'name',
      type: 'string',
    },
    {
      title: 'Slug',
      name: 'slug',
      type: 'string'
    }
  ]
}
What makes Sanity and other services like it so awesome is the ability to define relationships between data without having to deeply understand the complexities of data model relationships. I used to work at an agency that used a custom PHP CMS, and having to decide between belongs-to, belongs-to-many, has-one, or has-many was hands down the hardest part of working on any site.
Since an Owner would be creating Palettes, I used the reference type in my Palette schema to create this association relationship.
{
  title: 'Color Palette',
  name: 'palette',
  type: 'document',
  fields: [
    {
      title: 'Title',
      name: 'title',
      type: 'string'
    },
    {
      title: 'Slug',
      name: 'slug',
      type: 'string'
    },
    {
      title: 'Owner',
      name: 'owner',
      type: 'reference',
      to: [{type: 'owner'}]
    },
    {
      title: 'Colors',
      name: 'colors',
      type: 'array',
      of: [{type: 'color'}]
    },
  ]
}
Each Palette would hold a list of Colors so I used the of key to specify which other data type each element of the array would need to conform to.
{
  title: 'Color',
  name: 'color',
  type: 'object',
  fields: [
    {name: 'name', type: 'string', title: 'Name'},
    {name: 'value', type: 'string', title: 'Value'}
  ]
}
Getting Data
In order to make the next steps easier, I went ahead and seeded some data via the Studio hosted on sanity.io.
{
  "name": "Ryan",
  "slug": "ryan",
  "_id": "b524755a-25b6-4619-b92d-fb23779ea709",
  "palettes": [
    {
      "title": "CMYK",
      "slug": "cmyk",
      "_id": "a8659824-ebcd-4afe-a099-fffee9018024",
      "owner":{
        "_ref": "b524755a-25b6-4619-b92d-fb23779ea709",
      },
      "colors":[
        {
          "name": "cyan",
          "value": "#00FFFF"
        },
        {
          "name": "magenta",
          "value": "#FF00FF"
        },
        {
          "name": "yellow",
          "value": "#FFFF00"
        },
        {
          "name": "black",
          "value": "#000000"
        }
      ]
    }
  ]
}
Assuming we have data in the Sanity backend, the next step is to get it to the frontend. The easiest way to do this is to use the JavaScript @sanity/client package. This package provides an interface that can be called in other JavaScript files that, among other things, makes it much easier to work with GROQ queries. It needs a little bit of configuration to hook it up to your specific Sanity data.
import sanityClient from '@sanity/client'

const client = sanityClient({
  projectId: ({}).SANITY_ID,
  dataset: 'production'
  useCdn: false
})

export default client
Sanity says that the projectID isn’t sensitive data and is fine to expose over network calls, but I went ahead and put it in an ENV variable using the dotenv package just to be safe (more on this in the Sending Data section). Also, because of the live editing aspect of this project, the useCdn: false option is actually super important in this scenario to make sure that users aren’t seeing cached data after making updates to their colors.
Getting All Data
Once the Sanity client is configured it can be imported and used in any component. To retrieve data, the client.fetch() method must be passed a GROQ query as the first argument. It can also accept an optional second arguement, a params object containing dynamic variables.
<script>
  import client from '../sanityClient.js'

  const query = '*[_type == "owner"]'

  const getData = async () => {
    return client.fetch(query)
    .then(response => {
      ...
    })
    .catch(err => this.error(500, err))
  }
</script>
This paragraph from the GROQ documentation explains how a simple query works.
*returns all documents in the dataset that the current user has permissions to read. The documents are passed to a filter, which retains documents for which the expression evaluates totrue.
Since this query fetches the data for the homepage, which will show a list of all Owners, the query will use the * selector to return all documents, then filter out ones that do not pass the [_type == "owner"] check and return only Owners.
Because the client.fetch() returns a Promise, Svelte’s await blocks make it super easy to handle the different loading states in the UI.
<script>
  const getData = async () => {...}
</script>

{#await getData()}
  <Loading />
{:then}
  ...
{:catch error}
  <Error />
{/await}
Getting Some Data
Once someone is on a specific Owner’s page it makes sense to only load the data relevant to that Owner. To do this, we can use the client.fetch() params argument to pass variables to the GROQ query. Because part of the Routify link data includes the owner.slug data, that can be used to look up a Sanity owner with matching slug value.
<script>
  import { params } from '@sveltech/routify'
  import client from '../../sanityClient'

  const { owner } = $params

  const query = `
    *[_type == 'owner' && slug == $owner] {
      ...
    }
  `

  const queryArgs = {
    owner: owner
  }

  const getData = async () => {
        return client.fetch(query, queryArgs)
        .then(response => {
       ...
    })
    .catch(err => this.error(500, err))
  }
</script>
$params (not to be confused with the Sanity params argument) is a Svelte store imported from the @sveltech/routify package. It allows information to be pulled from the <Router /> and used inside other components.
Inside the GROQ query, the $ identifier can be used to interpolate a dynamic value. I did some abstracting in the block above to make the component a little easier to read, but the end client.fetch() call will look like this:
client.fetch(`
  *[_type == 'owner' && slug == $owner] {
    // projection here
  }
`, {owner: $params.owner})
.then(response => {
    ...
})
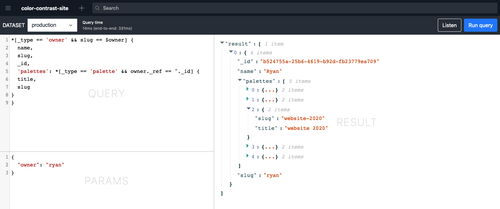
Once we’ve looked up the owner that matches the current page, we can use Sanity’s projections on that filter and get more data from it. The query can be expanded to look up a specific owner, get their _id attribute, then use that _id to look up all documents of the palette type that have a _ref value matching the Owner’s _id.
const query = `
  *[_type == 'owner' && slug == $owner] {
    name,
    slug,
    _id,
    'palettes': *[_type == 'palette' && owner._ref == ^._id] {
      title,
      slug
    }
  }
`
Projections are similar to GraphQL fields and can be used to shape the data that will come back in the HTTP response. The query above would return JSON data in the shape built out in the Projection. In a Projection, you are able to ask for any field that exists on a type.
{
  "result": [
    {
      "name": "Ryan",
      "slug": "ryan",
      "_id": "b524755a-25b6-4619-b92d-fb23779ea709",
      "palettes": [
        {
          "slug": "website-2020",
          "title": "website 2020"
        },
        { ... },
        { ... },
        { ... },
        { ... }
      ]
    }
  ]
}
Filters and projections can be nested as deep as necessary (though keep in mind this might slow a query down), and as many params as needed can be passed. That means that on the page for a specific color palette, the query looks like this:
const { owner, palette } = $params

const query = `
  *[_type == 'owner' && slug == $owner] {
    name,
    slug,
    _id,
    'palettes': *[_type == 'palette' && owner._ref == ^._id && slug == $palette] {
      title,
      slug,
      _id,
      colors
    }
  }
`

const queryArgs = { owner, palette }

const getData = async () => {
  return client.fetch(query, queryArgs)
  .then(response => {
    ...
  })
  .catch(err => this.error(500, err))
}
… and would return data like this:
{
  "result": [
    {
      "name": "Ryan",
      "slug": "ryan",
      "_id": "b524755a-25b6-4619-b92d-fb23779ea709",
      "palettes": [
        {
          "title": "website 2020",
          "slug": "website-2020",
          "_id": "NOuiz2BuYnd9zvcp3ofESs",
          "colors": [
            {
              "name": "primary",
              "value": "#0f3287"
            },
            {
              "name": "dark",
              "value": "#151d43"
            },
            {
              "name": "light",
              "value": "#eee9d5"
            },
            {
              "name": "highlight",
              "value": "#da4181"
            },
            {
              "name": "active",
              "value": "#df5909"
            },
            {
              "name": "disabled",
              "value": "#6577a6"
            }
          ]
        }
      ]
    }
  ]
}
The GROQ language can be a little confusing at first, and making a malformed query doesn’t always return a super helpful error message. One helpful tool that Sanity provides is the Vision Plugin. This plugin can be added to the project’s Studio, either locally or hosted on sanity.studio, and used to try out queries and see their potential response data.
Moving data around with Stores
Cool, so, once we have data, we need to move it around to the correct places. To do this I relied heavily on Svelte’s stores.
On each page, there are two main data concerns — the Sanity data that needs to be shown, and the actions that a user can take to interact with that data. In a stores.js file, I set up two writables that could hold this data.
import { writable } from 'svelte/store'

export const data = writable({
  loading: false,
  error: null,
  response: [],
  owners: [],
  owner: null,
  palettes: [],
  palette: null,
  colors: []
})

export const actions = writable({
  buttons: [],
  current: null,
  error: false
})
To keep page data in sync, every time I made a call to the Sanity client I then took the response from the fetch call and set the page’s $data store accordingly.
<script>
  import client from '../sanityClient.js'
  import { data } from '../stores.js'

  const query = '*[_type == "owner"]'

  const getData = async () => {
    return client.fetch(query)
    .then(response => data.set({
      ...data,
      owners: response
    })
    ).catch(err => this.error(500, err))
  }
</script>

{#await getData()}
  <Loading />
{:then}
  {#if $data.owners.length}
    {#each $data.owners as owner}
      <a href={$url('/:owner', {owner: owner.slug})}>
        {owner.name}
      </a>
    {/each}
  {:else}
    uh oh, there are no users.
  {/if}
{:catch error}
  <Error />
{/await}
$data holds multiple types of page information, so I used the …spread to copy the existing data and set a new value that only overwrites new data for the current page. On pages that had complicated data, it makes sense to use destructuring assignment to grab data off of the response object.
const getData = async () => {
  return client.fetch(query, queryArgs)
  .then(response => {
    const {
      name,
      slug,
      _id: ownerId,
      palettes
    } = response[0]

    const {
      title,
      slug,
      _id: paletteId,
      colors
    } = response[0]

    return data.set({
      ...data,
      owner: {
        name: name,
        slug: slug,
        id: ownerId
      },
      palette: {
        title: title,
        slug: slug,
        id: paletteId
      },
      colors: colors.map(color => ({
        name: color.name,
        value: color.value
      }))
    })
  }
  ).catch(err => this.error(500, err))
}
To load the specific actions for each page, I called the writeable.set() method any time a new layout was visited. On the /owner/palette route, a user needs to be able to add a new color, edit existing colors, or edit the JSON code.
<script>
  import { actions } from '../../stores.js'

  actions.set({
    buttons: [
      {
        text: 'add a color',
        title: 'addColor',
        icon: 'add',
        action: () => $actions.current = 'addColor'
      },
      {
        text: 'edit colors',
        title: 'editColors',
        icon: 'edit',
        action: () => $actions.current = 'editColors'
      },
      {
        text: 'see JSON',
        title: 'seeCode',
        icon: 'code',
        action: () => $actions.current = 'seeCode'
      }
    ]
  })
</script>
I mapped through these objects and used each to construct a button. Each configuration object could set things like a title and icon, and set the $actions.current value to render a different component to allow the user to edit data.
<script>
  import { actions } from '../stores.js'

  const icons = { ... } // a list of SVGs
</script>

{#each $actions.buttons as button}
  <button
    title={button.disabled ? `uh oh, there's a data error` : title}
    on:click={button.action}
    class:active={button.active}
    disabled={button.disabled}
  >
    <svelte:component this={icons[button.icon]} />
  </button>
{/each}
The actions component was a <form> tag that contained a giant if...else switch to conditionally show inputs that would post data back to the Sanity client.
<script>
  import { actions } from '../stores.js'

  const createNewColor = () => { ... }
</script>

<form id='action'>
  ...
  {if $actions.current === 'addColor'}
    <input
      type='text'
      id='new-color-name'
      name='new-color-name'
      bind:value={$data.color.name}
    />
    <input
      type='color'
      id='new-color-value'
      name='new-color-value'
      bind:value={$data.color.value}
    />
    <button on:click={createNewColor}>save color</button>
  {:else if $actions.current === ...}
</form>
Once the correct <input> elements are rendered, the Svelte bind: directive is used to update the $data store every time a user makes a change.
Netlify Functions
Now that we have data and users can create or edit data, we need a way to send that new data back to Sanity. The Sanity client can help here, with the .create and .mutate methods, but sending data requires a little more care than getting data.
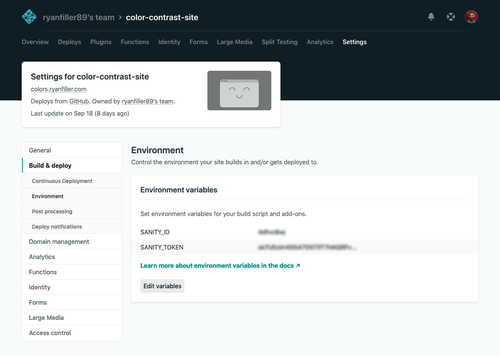
Technically, anyone is able to hit the Sanity url endpoint and query data. There are ways to lock this down, but in my app I’m not too worried about it. However, I don’t want just anybody to be able to write to that endpoint, which means I need a sanityClient configured with an authentication token. Tokens can be generated from the Sanity dashboard on manage.sanity.io, under Settings > API > CORS Origins.
const client = sanityClient({
  projectId: ({}).SANITY_ID,
  dataset: 'production',
  token: ({}).SANITY_TOKEN
})
I’m choosing to host this site statically on Netlify, so I can’t include that token in the project. Firstly, it would be exposed in the project’s git repository, and secondly it would be sent openly “over the wire” in each HTTP POST request.
This is where Netlify’s serverless functions come in.
“Serverless functions” are not actually functions that don’t run on a server, they just don’t run on your server. A more accurate name for them is “cloud functions” since they run on other servers that exist only to perform one small action at a time.
Netlify Functions are pretty straightforward to set up. There are steps in the documentation on how to set them up via the online interface, or how to set them up directly in the netlify.toml file.
I set up two small functions, one to create and one to mutate, and they look almost exactly the same. The contents of each file in the /api folder will be packaged and deployed to a cloud server somewhere, so a new sanityClient needed to be created instantiated of each.
require('dotenv').config()
const sanityClient = require('@sanity/client')
const client = sanityClient({
  projectId: ({}).SANITY_ID,
  dataset: 'production',
  token: ({}).SANITY_TOKEN
})

exports.handler = async function(event, _context, callback) {
  const payload = JSON.parse(event.body)
  const result = await client.create(payload, { returnDocuments: true })
  callback(null, {
    statusCode: 200,
    body: JSON.stringify(result)
  })
}
require('dotenv').config()
const sanityClient = require('@sanity/client')
const client = sanityClient({
  projectId: ({}).SANITY_ID,
  dataset: 'production',
  token: ({}).SANITY_TOKEN
})

exports.handler = async function(event, _context, callback) {
  const payload = JSON.parse(event.body)
  const result = await client.mutate(payload, { returnDocuments: true })
  callback(null, {
    statusCode: 200,
    body: JSON.stringify(result)
  })
}
The returnDocuments: true option in the configuration object is important because it tells Sanity to return a representation of the document after the update request has succeeded. This means that the app can listen for the fetch.response and update accordingly with the latest data.
To avoid exposing my token credentials in these functions, I used the dotenv package again. After this package is installed, its config() method needs to be called as soon as possible in the project, so I put it at the top of my rollup.config.js file.
import dotenv from 'dotenv'
dotenv.config()
process.env values can be defined in a .env file locally (make sure to add this to your .gitignore and commit it!), and in the Settings > Deploys > Environment section of the Netlify dashboard. These values don’t have to match in both places, but they do both need to be valid tokens.
Sending Data
Once the Netlify Functions have been deployed, they live at a url corresponding to the name of the .js file.
To send data to these endpoints, I intercepted the POST action of the <form> element in my actions-area.svelte component. Since the <input> values are bound to the $data store, I could get values directly from the $data object and fetch against my Netlify function url.
Adding new data means posting a new object to the /functions/create endpoint. This object defines the _type and information of the new document to be created.
const createNewOwner = () => {
  fetch(`/.netlify/functions/create`, {
    method: 'POST',
    credentials: 'same-origin',
    headers: { 'Content-Type': 'application/json' },
    body: {
      _type: '$data.owner',
      name: $data.owner,
      slug: slugify($data.owner)
    }
  }).then(response => response.json())
  .then(response => {
    $data.owners = [...$data.owners, response]
  })
  .catch(error => console.log('error', error))
}
In order to make sure that a user is seeing the most up to date representation of the data, every time a fetch call is made the $data store is updated with the response object from the Netlify function.
Adding to the colors array, since it involves editing existing data rather than creating new data, is slightly different. To do this I need to hit my /functions/mutate endpoint and give Sanity a patch to make.
const createNewColor = () => {
  fetch(`/.netlify/functions/mutate`, {
    method: 'POST',
    credentials: 'same-origin',
    headers: { 'Content-Type': 'application/json' },
    body: [
      {
        patch: {
          id: $data.palette.id,
          insert: {
            after: 'colors[-1]',
            items: [ { name: $data.color.name, value: $data.color.value } ]
          }
        }
      }
    ]
  }).then(response => response.json())
  .then(response => {
    $data.colors = response[0].colors)
  })
  .catch(error => console.log('error', error))
}
Because I need to add to append to the current array of colors the /functions/mutate endpoint takes an array of mutations to be performed on the document with the corresponding id value. Because of the returnDocuments: true option sent along with the request, I can then take the entire new array that contains both my old and new colors and set it to the $data store.
Still TODO
Tests
This application could probably use some tests, and this would be a good opportunity to explore mocking network activity using Cypress. I might get around to this in the future, but since this was just a fun side project there’s also a chance I won’t make time to thoroughly test it.
Authentication
Right now, this app works on the honor system — anyone can edit any colors. I hope they won’t, but if this becomes a problem I could add authentication that would limit people to only making edits to things they were an Owner of. This might be a good learning experience for the fun of it, too. I could maybe implement Netlify Auth, which I’ve worked a little with in the past, or take a look at something completely new like Auth0. I’ve heard good things about Auth0 and how it can be used as a serverless function.